The Data View
Introduction
After clicking on the Data area in the VocBench Sections Menu, the user lands on any of the various Data View pages. All of the data pages are composed of two main areas: the structure on the left, and the resource view on the right.
For instance, the structure section for the Class Page is composed of a Class Widget and an Instance Widget. The first one shows the tree of Classes in the current project, while the latter shows the list of instances for the class selected on the Class Widget.
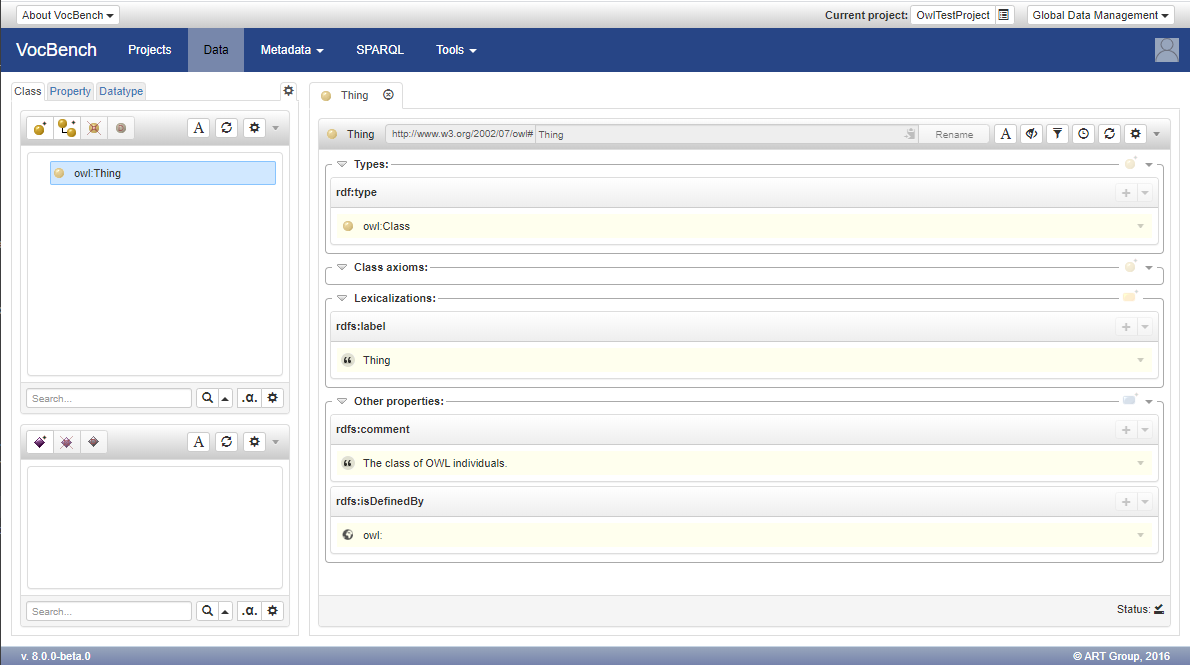
The Data Structure View
All structure areas in the Data View have two buttons in common (upper-right part of the structure area).
The Rendering Button ![]() activates the rendering for the resources shown in the structure. By default, the rendering is deactivated for OWL entities and activated for SKOS ones.
activates the rendering for the resources shown in the structure. By default, the rendering is deactivated for OWL entities and activated for SKOS ones.
The Refresh Button ![]() allows the user to refresh the view on the structure. Usually structures are kept aligned with changes occurring from any operation. However, it might happen that certain actions cannot be intercepted in all of their outcomes (e.g. a massive inclusion of data); in these case normally a refresh is automatically invoked, though a manual button is included for all those cases which cannot be foreseen by the system.
allows the user to refresh the view on the structure. Usually structures are kept aligned with changes occurring from any operation. However, it might happen that certain actions cannot be intercepted in all of their outcomes (e.g. a massive inclusion of data); in these case normally a refresh is automatically invoked, though a manual button is included for all those cases which cannot be foreseen by the system.
A gear button ![]() , present on the top-right most part of the data structure view, allows to choose various options that are used globally for all structures. Currently, the only one available is for toggling the visualization of deprecated resources.
, present on the top-right most part of the data structure view, allows to choose various options that are used globally for all structures. Currently, the only one available is for toggling the visualization of deprecated resources.
A dropdown menu button ▼ provides a list of further actions.
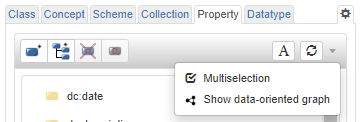
All structure areas have just two items in common in this menu
- Multiselection: Enables the selection of multiple resources under the tree/list structure in order to apply changes to all of them at the same time.
- Show data-oriented graph: Shows the data through a graph representation (available only when a resource is selected). More details in the dedicated page.
When the Multiselection is enabled, a checkbox appears next to each resources in the structure. Only when at least one of them is ticked, a further item 'Add a property value to the selected values' is enabled in the menu. As its label suggests, this item allows the user to add a property-value pairs to each checked resource.
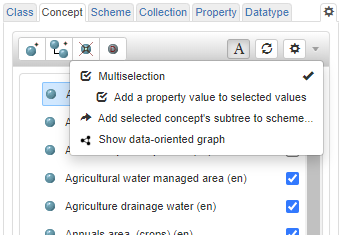
Other buttons in the panel heading and items in the dropdown menu may appear depending on the specific data structure being viewed (see later for more details)
Rename tabs / hide tabs
It is possible to rename one or more tabs in the Data Stricuture view. Only the Administrator, or the Project Manager have this possibility.
To rename one or more tabs, first log in to VocBench, as administrator, and then click on the avatar and select "Administration"
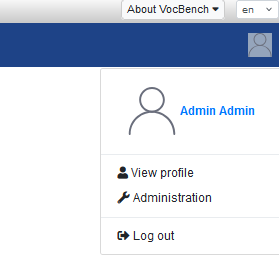
In the list of project, select the desired one (the one that will have the tabs name changed) and then click on the "Project Settings". In it, click on the tab "Other"
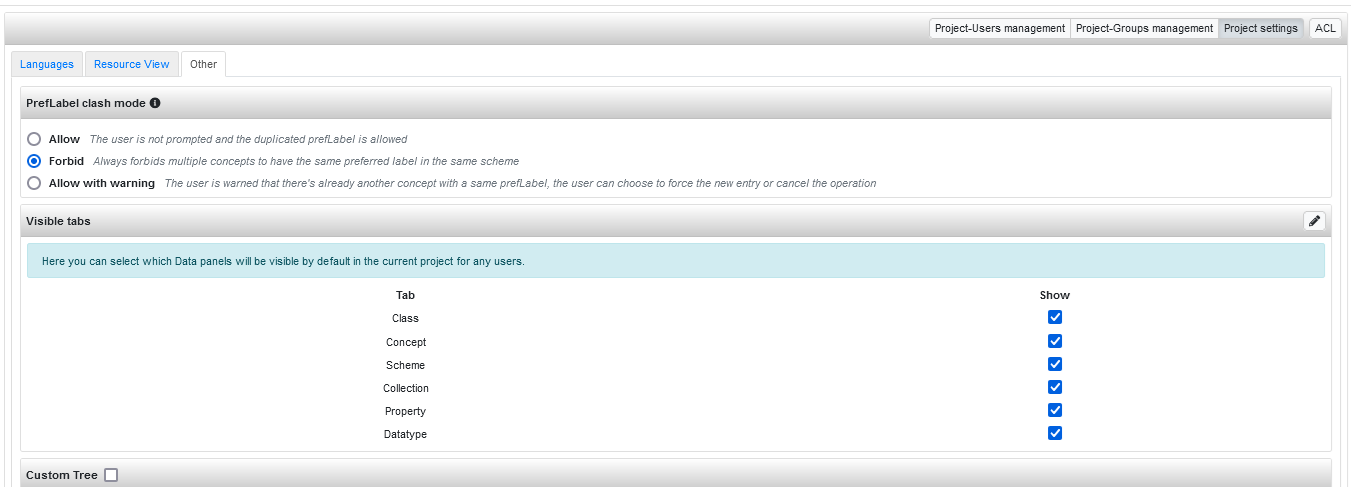
Then click on the pencil button, in the "Visible tabs" section to open the windows having the list of available tabs, with the current name. Click on the "+" button and select a language (e.g "en"). Now it is possible to set a new label for any of the existing tabs. For example, it is possible to rename the "Concept" tab into "Concept Tree".
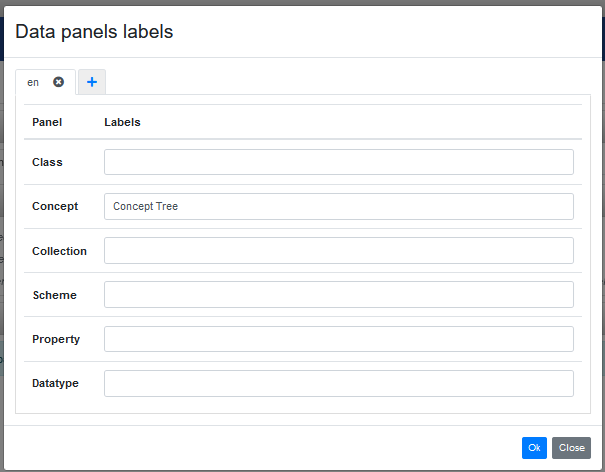
Click on "Ok" to save the change and return into the desired prject view (by selecting such project as the "Current project", for example) to see the tabs (on the left side) and see that the changed one has the new name (in this example it went from "Concept" to "Concept Tree")

It is also possible to hide one or more tabs. Return in the "Administration" section, select a project, click on "Project settings" and then on "Other" (so the same procedure was done for the rename of a tab) and, to hide a tab, uncheck the "Show" checkbox near the desired tab. For example, uncheck "Collection" and "Property"
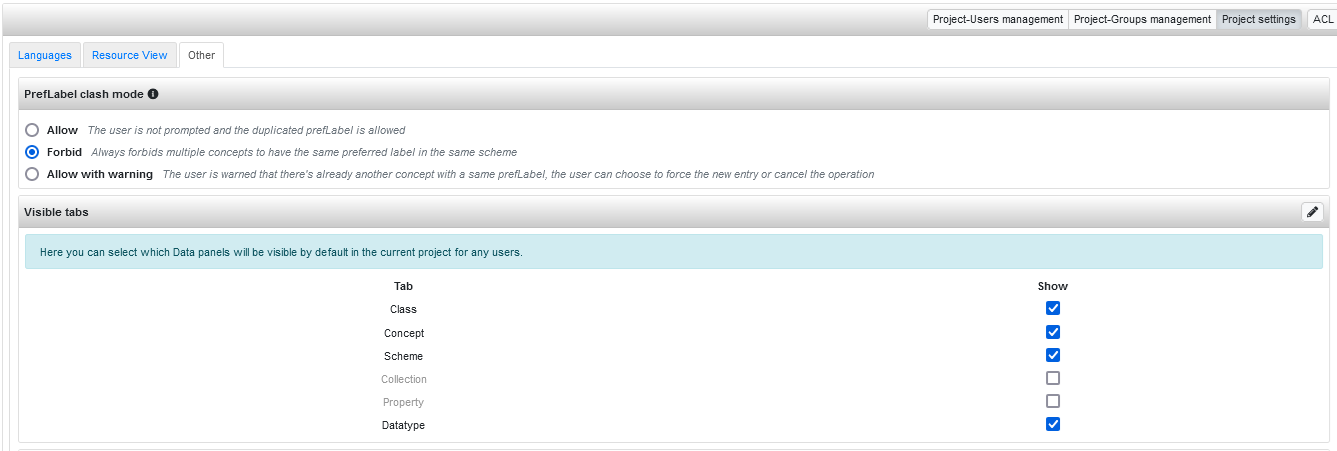
Return inside the project (to see the project data) and now the tabs that had the "show" checkbox unchecked are no longer visible

The Resource View
The resource-view is a general widget for showing the details of different kind of resources. The resource-view is adaptive wrt the shown resource. So, in the case of classes, class axioms will be highlighted, in the case of properties, the different facets of the property (i.e. OWL types denoting further characteristic of the property) will be shown in a dedicated area, and so on for each major type of resource defined in the RDFS, OWL, SKOS and SKOS-XL vocabularies.
Every time a new resource is being inspected, a new tab on the resource-view will be opened on the resource, while keeping the history of opened tabs.
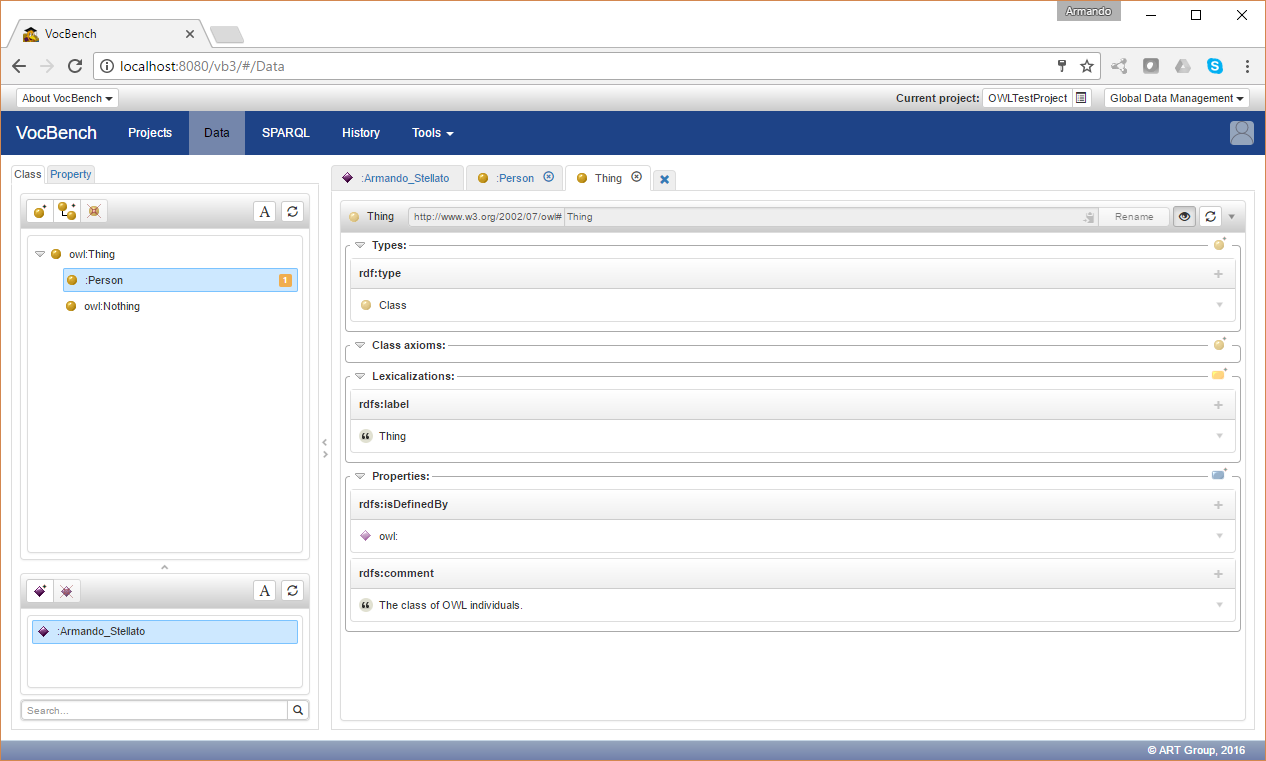
A click on the X symbol available after the last tab will kill all open tabs but the selected one.
Operations available on the Resource View
Each of the partitions that compose the resource view (see figure below) shows a set of operations that are possible on it.
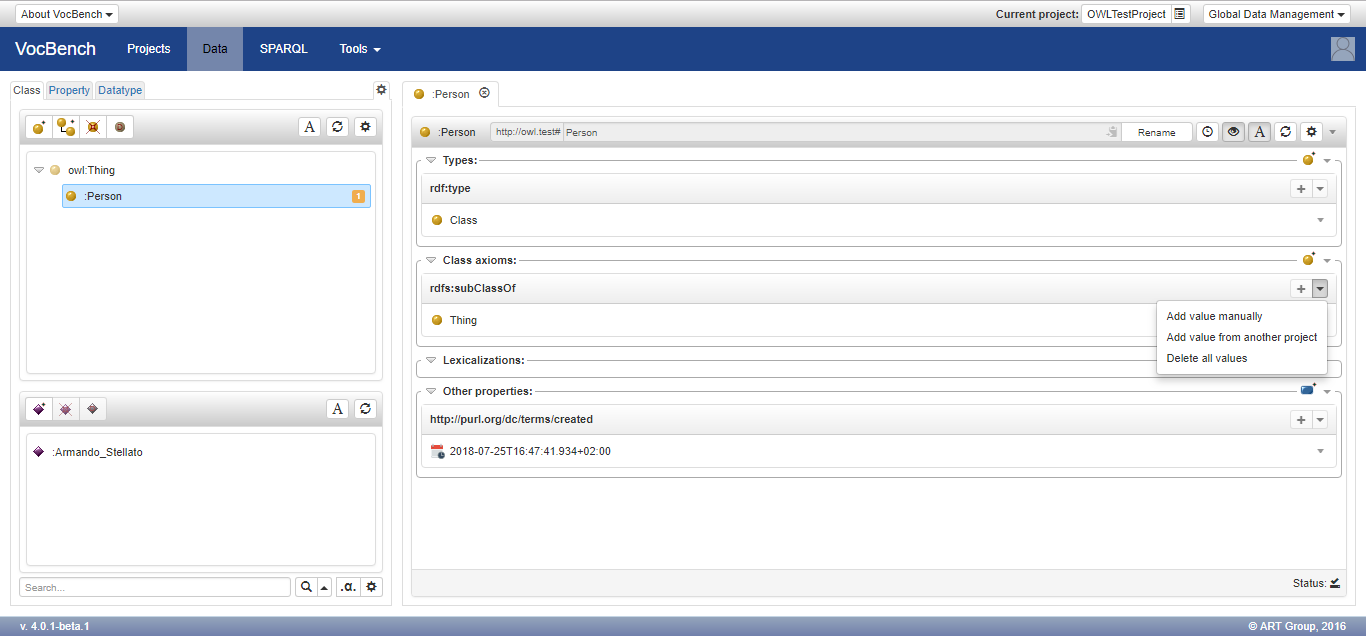
There are three different class of areas providing operations:
- Partitions
- The single properties being shown in each partition
- The values shown for each property
Partition-level operations
Each partition may be responsible for a single property or for a set of properties, according to some logical grouping. Usually, when representing a single property (as it is the case of the "types" partition) the partition still accounts for all the subproperties (e.g. subproperties of rdf:type in this case) of the property associated to it.
The following actions are possible:
- An iconed "add" button, with an icon associated to the usual type of values being added on that partition (e.g.
 for properties pointing to classes, such as those related to types), associated to a default add action, depending on the kind of object:
- link to an existing resource for resource values
- create a new value for literals
- besides the add button, a menu with a series of options. The options may vary depending on the partition and on the nature of the resource being shown on the resource view. However, the following actions are generally available:
- Add value manually: allows the user to add a value using NT syntax (e.g. URIs in between <>, literals in between "" with an additional language tag for language literals or a type for all other typed literals, etc..).
- Add value from another project: allows the user to add a resource browsing an external (local) project (this external project must have granted access to the current project).
Any "add" action chosen from the partition, allows the user to choose the property from the set of properties associated to the partition and/or from their subproperties.
Property-level operations
After a value is being added for a certain property, that property is listed under its associated partition. The following actions are made available besides each shown property:
- An + button, associated to a default add action, depending on the kind of object:
- link to an existing resource for resource values
- create a new value for literals
- besides the add button, a menu with a series of options. The options may vary depending on the partition and on the nature of the resource being shown on the resource view. However, the following actions are generally available:
- add value manually: allows the user to add a value using NT syntax (e.g. URIs in between <>, literals in between "" with an additional language tag for language literals or a type for all other typed literals, etc..)
- Add value from another project: allows the user to add a resource browsing an external (local) project (this external project must have granted access to the current project).
- Delete all values: deletes all values linked to the viewed resource through this property
Any "add" action chosen from the actions besides each property, is restricted to use that property, and thus allows the user to only choose/create the value to be added.
Value-level operations
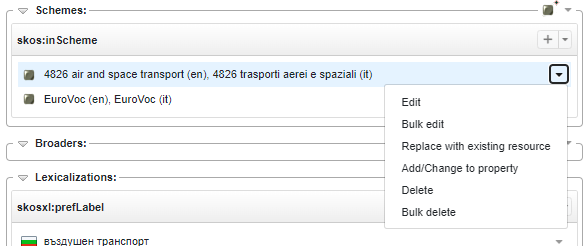
These operations are shown on a menu located on the rightmost part of the widgets showing the values associated to the viewed resource through certain properties. The actions associated to them depend on the nature of the value (resource or literal) and on the partition type.
- All resource values generally allow for these actions
- Edit: edits the value by using the NT notation. Please notice that the linked resource is not renamed. This simply changes the mention of the pointed resource. Remember to be careful in proceeding with this action as it is very easy to point to non-existing resource. The possibility to point to a non-existing resource is allowed as the intention of the user could be to mention an external existing resource that is possibly not available on the web. It is also possible to change the nature of the pointed value (e.g. changing its value from a resource to a literal). If the nature is not compatible with the property of the triple, a message will warn the user on the possible consequences of this choice.
- Replace with existing resource: this option allows the user to choose another resource from the current dataset and making it replace the previous value
- Delete: deletes the connection to the pointed resource. Please notice that the pointed resource is not deleted from the dataset, only the connection to it through the property used in the triple
- All literal values generally allow for these actions
- Edit: edits the value by using the NT notation. It is possible to change the nature of the pointed value (e.g. changing its value from a literal to a resource). If the nature is not compatible with the property of the triple, a message will warn the user on the possible consequences of this choice.
- Edit literal content: edits the content of the literal, so excluding the eventual language tag or datatype. This action is also available for the skosxl labels (even if they are not literals). In case of literals with datatype rdf:HTML the HTML editor will be opened.
- Copy value to other locales: copies the literal value to other locales. This action is available for language-tagged literal only in some partitions and only if the language has locales available or it is itself a locale.
- For all kind of values these actions are available:
- Assert inferred statement: explicitly asserts an inferred statement. The inferred statements are recognizable by a really light blue background.
- Bulk edit: edits the value for all the S-P-O statements with the same predicate-object pair. This action uses the same NT notation seen for the Edit aforementioned. This action is available only in some partitions.
- Add/Change property: replaces the predicate that links the resource to the value, or, according a subsequent choice by user, simply copies the same value to another predicate.
- Bulk delete: deletes the value from all the S-P-O statements with the same predicate-object pairs. As well as for the Edit action described before, this action doesn't delete the pointed resource from the dataset, it simply delete the connection to the resource through the property. This action is available only in some partitions.
- Further actions are also available exclusively for skosxl labels of concepts:
- Move xLabel to another concept: removes the xLabel from the concept and assigns it to another concept.
- Spawn new concept from this label: removes the xLabel from the concept and creates a new concept assigning it the xLabel.
Status button
On the bottom right of the resource view, there is a small status button the appearance of which reflects the mechanism used to retrieve the data about the displayed resource and, consequently, its position (i.e. local project or remote dataset). The table below describes the meaning of the different icons.
|
Local Resources
|
 |
Resource in the current project, which is accessed directly via the RDF4J API |
 |
Resource in another local project, which is open and accessible by the current project (according to the ACL). Similarly to the case above, the resource is accessed directly via the RDF4J API | |
|
Remote Resources
|
 |
Remote resource that is accessed by dereferencing its IRI (typically an HTTP URL). The resource view is severely limited by the inability to access information not readily available in the subject page of the resource |
 |
Resource in a remote dataset that is accessed via SPARQL. In this circumstance, the resource view behaves similarly to the case of local projects | |
 |
Resource in a remote dataset that is accessed via a simplified use of SPARQL. In this case, the remote SPARQL endpoint is unable to handle the complex queries associated with the resource view, which fall backs to simplified queries. The resource view behaves like in the dereferentiation scenario, but it also expands some objects (e.g. SKOS-XL reified labels) |
A click on the status button opens a popup that indicates explicitly the name of the access method and, depending on the scenario, the accessed project or the accessed remote dataset.
The position of a resource (local vs remote) is determined by matching its namespace against the one associated with a local project or a remote dataset. In the latter case, the information (together with the available access mechanisms) is stored in the Metadata Registry. In fact, irrespectively of the declared namespace, a resource is located in the current project, if it occurs as the subject of any triple.
If the position of a resource can't be determined, the resource view fall backs to dereferentiation, while a red exclamation mark is placed near the status button to let the user know that this access was not informed by metadata in the Metadata Registry. If the user clicks on the status button, the displayed popup reports that this is an attempt to dereference a resource in an unknown dataset and offers a button to start the process of automatic discovery of the dataset metadata. If the discovery succeeds, the resource view is reloaded, aiming at an improved visualization by exploiting the just discovered metadata.
Alignment to an External Resource
Resources in a VocBench project can be aligned to resources available in the same project or to external resources. These external resources can be looked in other projects available on the same VocBench instance or in remote datasets. The option for alignment is available from the general menu at the top-rightmost part of the resource-view, as shown in figure below

The user will then start the procedure for alignment...

it is possible to select a mapping property and to choose three different ways to provide the target resource
- Browse local projects
- Assisted search
- Enter value manually: allows the user to set an IRI manually
Let's see in details the first two options.
Browse local projects option allows to browse the resources trees/lists of the target repository, looking for the candidate match (figure below). Note that, in order to be inspectable, the other projects must have granted access to the project that the user is logged on.
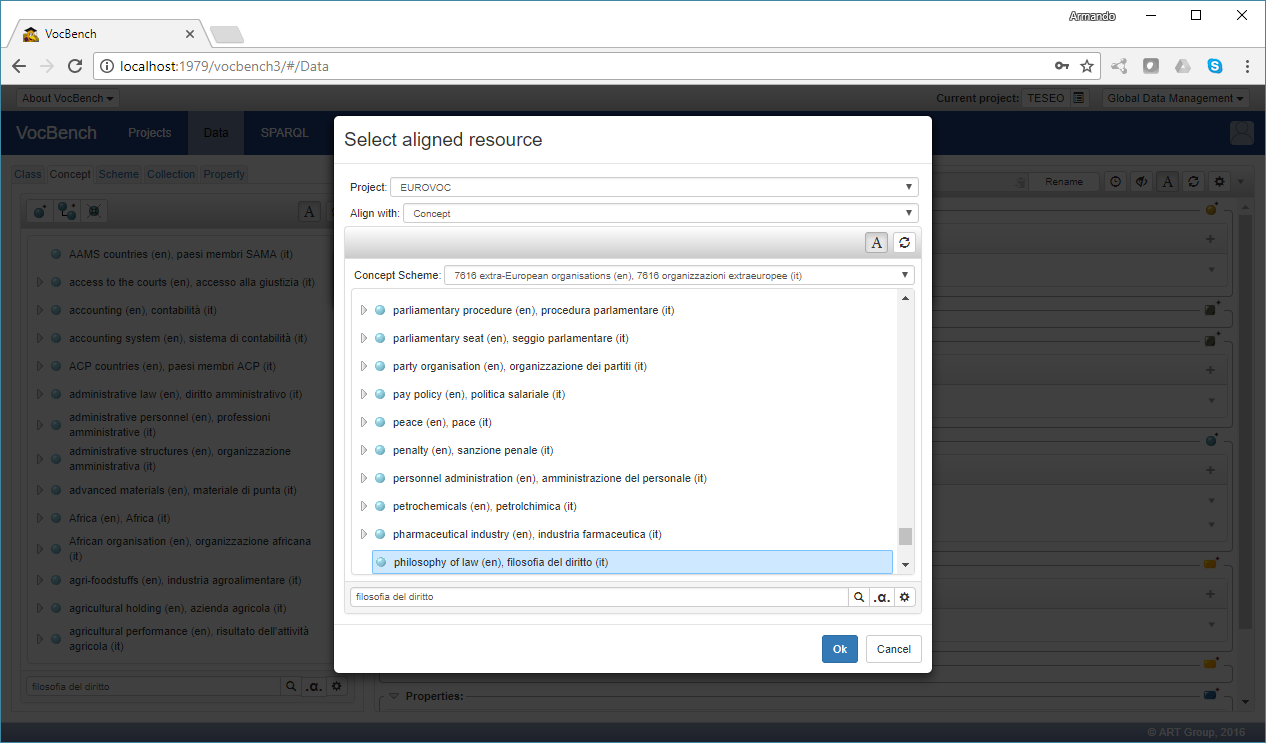
After clicking on "ok", the matched resource is visible on the resource-view (figure below)
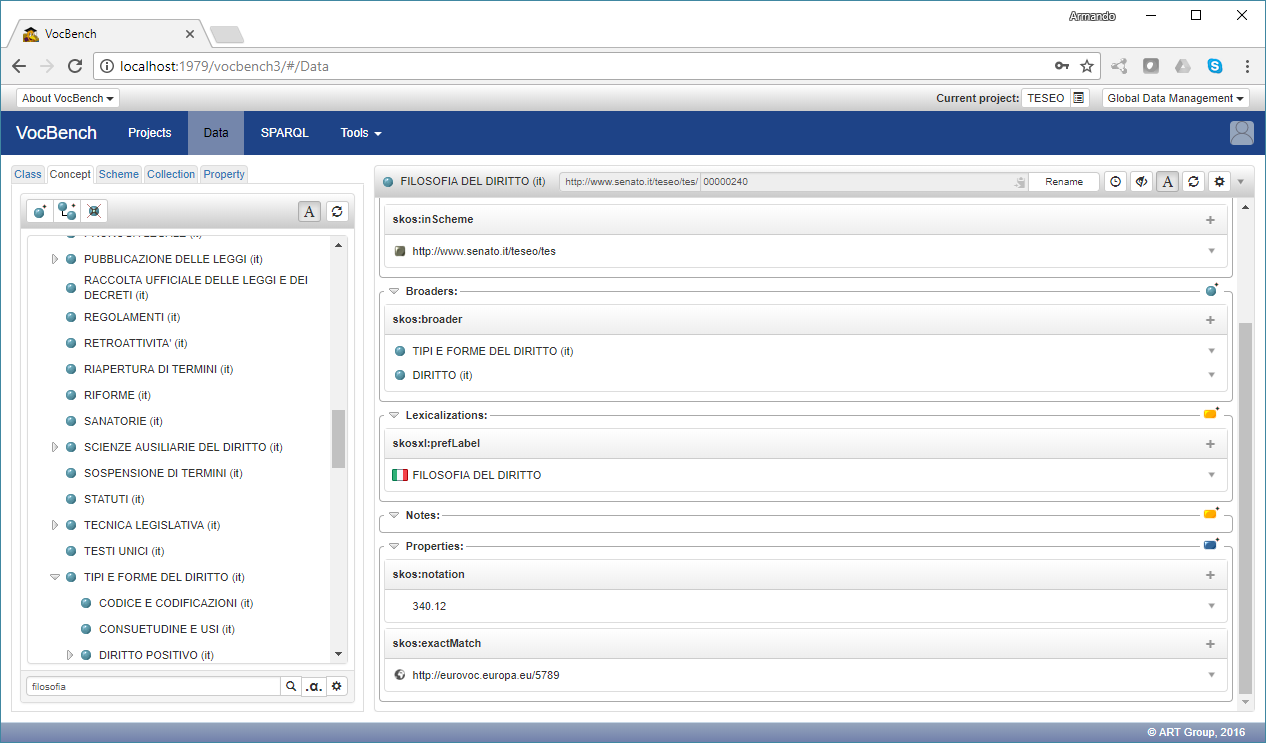
Assisted search is a search-based way to discover potential match in external local projects and remote datasets. In the dialog that introduces this feature there is a selector for switching the target of the alignment: a resource in a local project or in a remote dataset. If local is selected, it will be listed the open local projects that grant access to the current project, if remote it will be listed the remote datasets defined in the Metadata Registry, it is also possible to define a new dataset on the fly.

In order to operate, the assisted-search needs to profile the mediation between the resource to align and the target project/dataset, consequently it needs metadata about the target project/dataset. In case these metadata are missing, if the target is local it is possible to generate them on the fly, otherwise, if the target is remote it is necessary to generate them from the Metadata Registry management page.
Once the mediation is done, the UI shows a list of lexicalization sets shared between the source resource and the target project/dataset. Then it is possible to select the language (among the ones listed as result of the aforementioned mediation) and the string match modes on which to base the search.
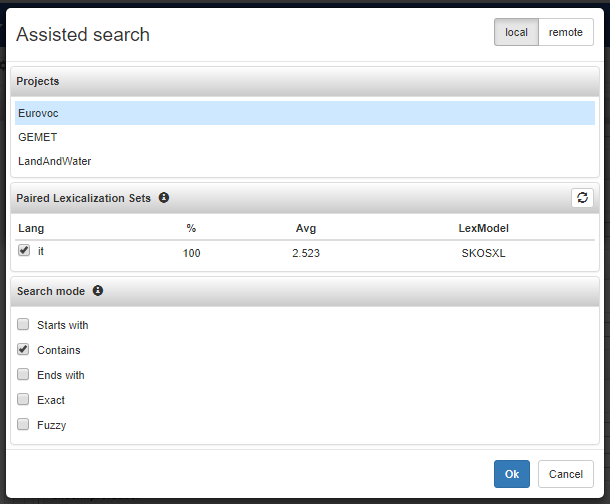
The search will return the resources that matches the search criteria, so the resources that may represent a candidate for the alignment, accompanied by the language and the string match modes which satisfied the match.

Customization of ResourceView
The aspect of the ResourceView can be customized according the user preferences. In the top right corner of the ResourceView, a "cog" button opens a dialog that allows to edit the settings.
The following preferences can be edited:
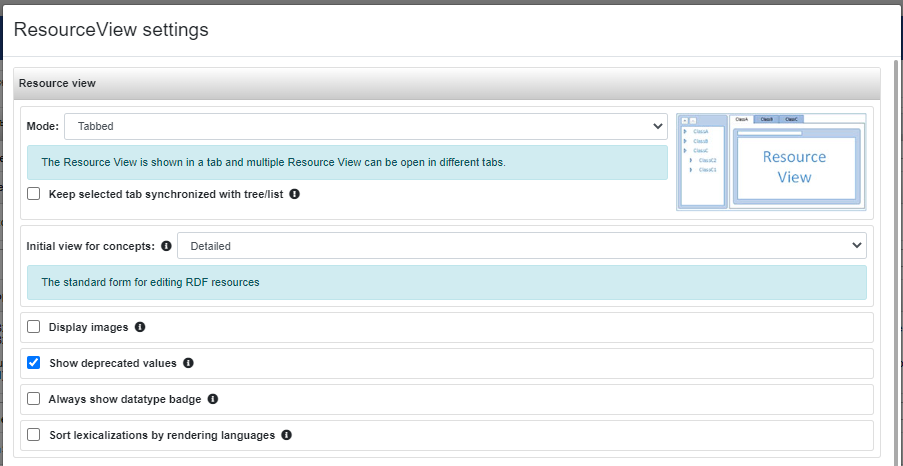
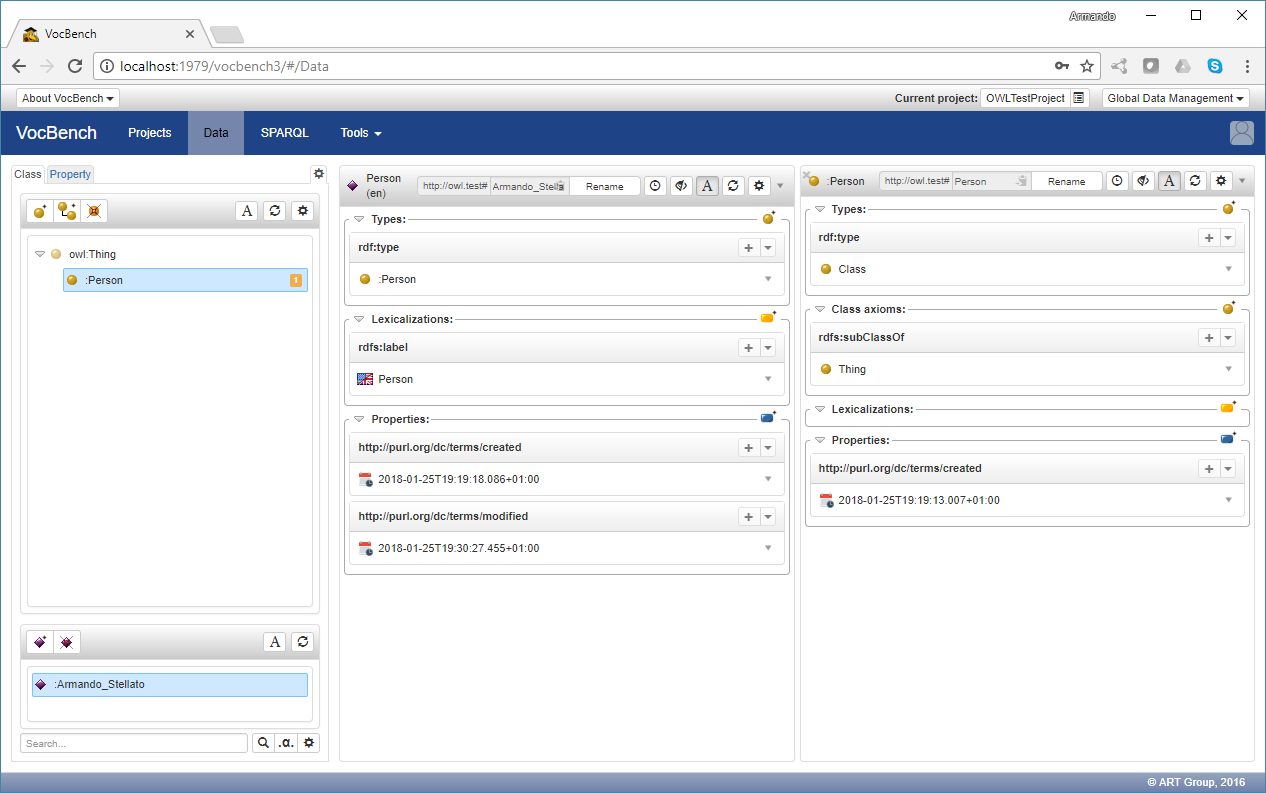
- ResourceView mode: by choosing the option "splitted" instead of the default "tabbed", instead of keeping an history of tabs, the resource-view will keep two parallel screens. Every time a resource is double clicked on the main view (the left one), it is expanded in the secondary view (the right splitted panel). This is very useful when willing to examine several resources while keeping the eye on a given specific resource. When the "tabbed" mode is active, a further option is available that allows to keep the selected tab synchronized with the tree/list shown in the left side of the Data view.
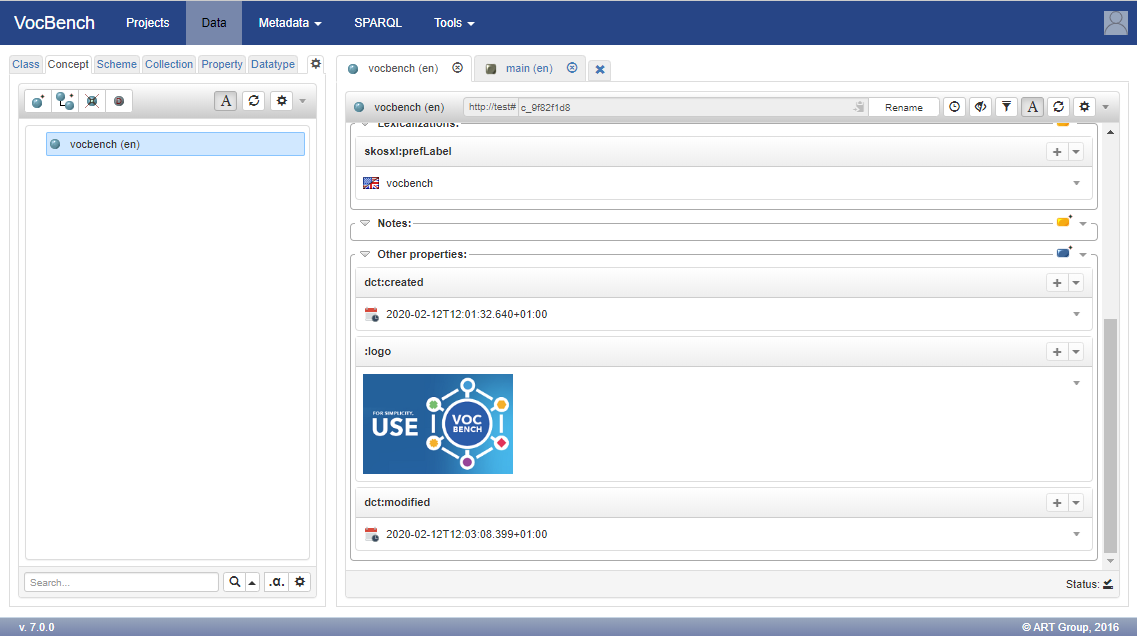
- Display image: If enabled, URL values resolvable to images on the web will be displayed as images (preview) in the ResourceView.
-
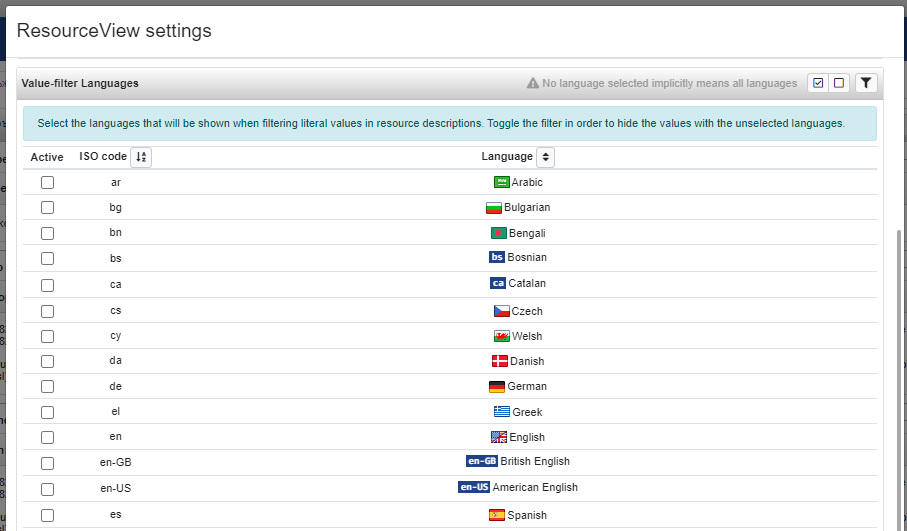
Value-filter languages:
allows to define a language-base filter in order to show or hide literal values in the ResourceView.
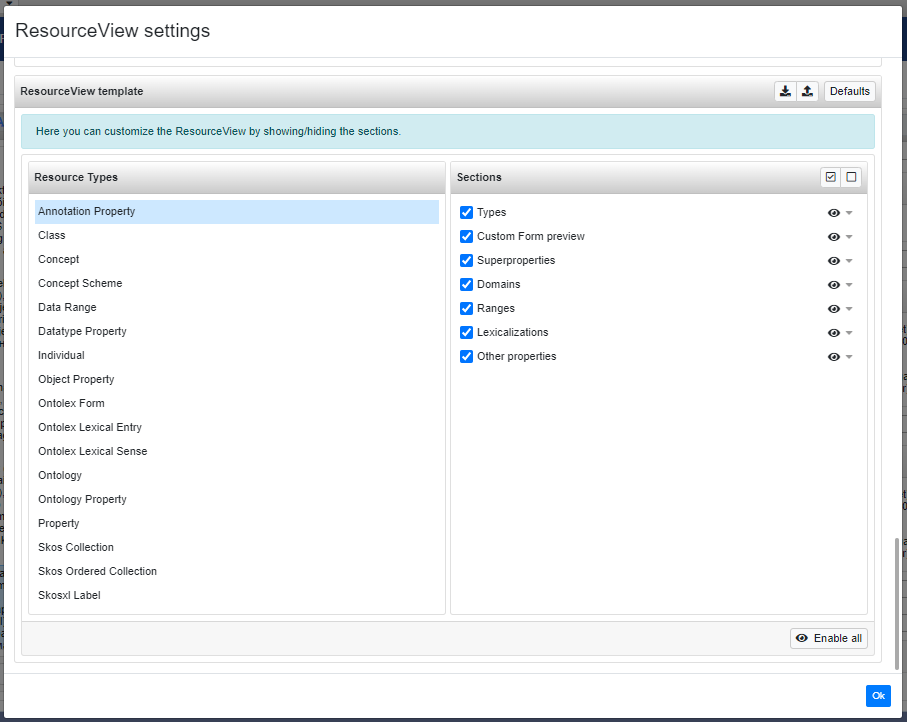
- ResourceView template: from this panel is possible to show or hide entire partitions of the ResourceView in order to make it more readable if the user is not interested in some of them. The panel is splitted in two sub-panel. The left one lists all the available resource types (e.g. Concept, Class, ...), for each of them is possible to check/uncheck a specific partition in order to show/hide it from the view. The Partitions panel provides also quick actions. From the header buttons is possible to check/uncheck all the partitions, while the arrows beside the eye icons expand a menu for setting visible or hiding the given partition for all the resource types. The "Enable all" button placed on the panel footer restore as visible all partitions of all resource types.
The ResourceView template panel header provides a toolbar that allows to:- Store a template as configuration.
- Load a template configuration previously stored by the user (also in another project) or even from other users (according the level chosen during the store operation).
- Set the current configuration as default for all the projects or restore the default configuration (action available from the "Default" dropdown button).
Here below an image of a splitted ResourceView, showing both an individual and the class it belongs to:
And here an image of a ResourceView in tabbed visualization mode. The screenshot demonstrates also how an image is displayed when the Display image preference is enabled.
Some of these preferences are also available in the Preferences page described in the following section.
Undo
From version 10.0.0 of VocBench, the Undo feature is available. This feature can be enabled during the project creation and can disabled (or enabled back) through the project settings editor.

When this feature is enabled, using the button in the top bar, or through the key combination ctrl+Z (or cmd+Z on Mac), it is possible to reverse the operations on data that the user has performed. The system keeps a stack of the last 10 operations performed on data, so user can reverse up to 10 operations. This limitations is overcome if the History feature is enabled as well. When an operation is reversed, a notification is shown on the bottom right corner of the screen.
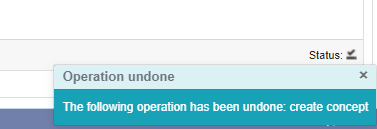
Moreover, whereas it is possible, the previous status is restored also in the UI, e.g. a resource restored in a tree/list, a value restored in the ResourceView, a commit restored in the History/Validation page.
It is possible to reverse only operations performed by the same user that execute the undo, any action performed by any other user stops the ability to perform further undo.

User Preferences for Visualization
Through the user menu - and only when a project is being accessed - it is possible to open the Preferences page.

Currently, the most prominent preferences options cover:
- Resource-view mode: determines the visualization mode of the Resource view. This is the same preferences described in the previous section.
- Display images: If enabled, URL values resolvable to images on the web will be displayed as images (preview) in the ResourceView.
-
Languages: this panel covers three language preferences:
- Rendering: the chosen Rendering-Engine establishes how resources are shown on the screen. There's no a-priori constraint on the strategy being chosen for representing resources as the rendering-engine can virtually perform any operation (an extension point allows to plug customized rendering engines). However, all Rendering-Engines have the possibility to use the languages property set through the preferences in order to choose which lexicalizations to represent. The Languages section offers a user-friendly view for choosing the set of languages that can be considered by Rendering-Engines for rendering the resources on the various views of VB. The defined languages can be sorted by name, code or the rendering order ("position" column) chosen by the user. The "active" column determines which languages have been selected for being shown. No selection is equivalent to "show all languages".
- Editing: allows to select the language prompted by default when creating a new language-tagged literal. The language list is restricted to those languages assigned to the user in the current project (see here)
- Value-filter: allows to define a language-base filter in order to show or hide literal values in the ResourceView.
- Show flags: the evergreen of UI debates! Flags do not properly fit the representation of languages, as they are bound to countries...nonetheless they are cool! Users can choose here which option to adopt.
- Project theme: it is possible to customize the color theme for each project. This choice is user-locale so won't affect the color on the same project for other users.
Search
Navigation in tree and list panels is supported by a search bar for finding resources in the dataset.
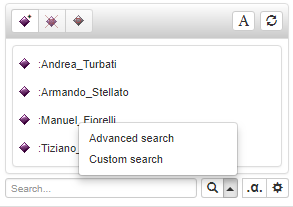
The Search Bar
The search bar provides three different search modes
- Standard search: a "simple" search that looks for a prompted string
- Advanced search: a more powerful search which allows to apply filters
- Custom search: a search based on parameterized SPARQL queries
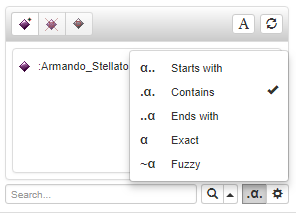
Besides the "lens" symbol for searching, a quick option button allows to choose the strategy for search, among:
- Starts with: looks for resource having at least a lexicalization starting with the prompted string
- Contains: looks for resource having at least a lexicalization containing the prompted string
- Ends with: looks for resource having at least a lexicalization ending with the prompted string
- Exact: looks for resource having an exact match with the prompted string
- Fuzzy: looks for resource having an approximate match with the prompted string
The gear button on the Search bar opens a further set of options:
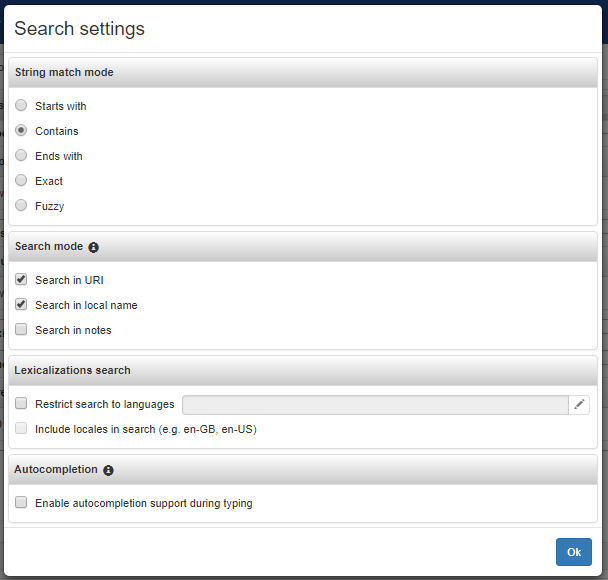
The following options are available:
- The first option (String match mode) is related again to the search strategy, also available as a quick option on the bar.
- Search mode: if the search (normally acting on lexicalizations only) should be extended to look into the whole URI, the local name of the resource and eventual notes.
- Lexicalizations Search: allows the user to restrict the search only to some languages. If the "Include locales in search" option is ticked, locales will be searched even if they are not explicitly marked in the restricted list of languages.
- Autocompletion: enables the autocompletion of the search string while this is being typed by looking on all available lexicalizations (and local names if included in the search).
- Classes-Instances panel search (available only in classes-instances panel): by default both classes and instances are searched (as in all resource-specific sections, first a list of matched resources is returned, then the resource selected by the user will be resolved in its proper subsection, class or instance). Through this option it is possible to constrain the search to only one of these sets.
- Concept search (available only in concept panel): through an option contained in this section it is possible to constrain the search to only the currently active skos:ConceptScheme(s).
Advanced Search
The advanced search is a powerful search tool that allows to search resources in the dataset with the support of a set of more complex filters than the ones of the standard search. Unlike the standard, this search looks for any resource in the dataset, so it is not constrained to the kind of resource shown by the panel where the search is executed/invoked.
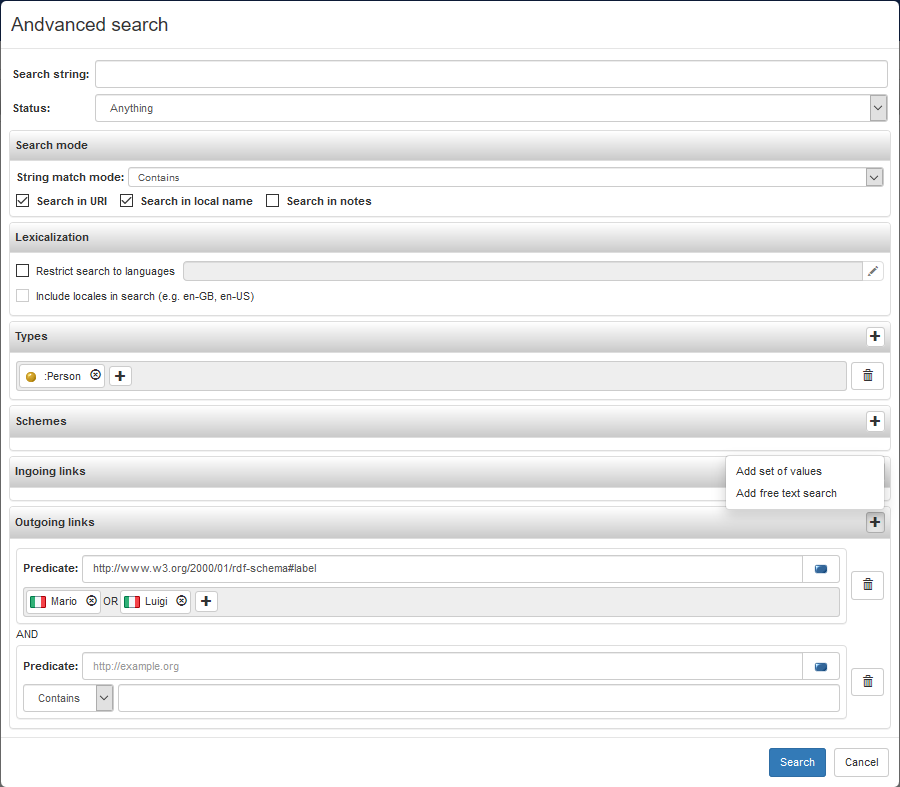
It foreseen the following filters:
- Search string: it is optional, if provided, similarly to the standard search, this string is used to search a resource according the criteria specified in the Search mode section.
- Status: allows to search resources by status. Available statuses are Anything, Not deprecated and Only deprecated.
- Search mode: see the description in the previous section.
- Lexicalization: see the description in the previous section.
- Types: if provided, filters the results to the resources belonging to the given class. Multiple classes are evaluated in AND
- Schemes: similarly to the Types, filters the results to the resources belonging to the given scheme (only in projects where the concept tree is available). Multiple schemes are evaluated in AND.
- Ingoing links: filters the results according to subject-predicate pairs. Multiple pairs are evaluated in AND, multiple subjects in OR.
- Outgoing links: filters the results according to predicate-object pairs. Multiple pairs are evaluated in AND, multiple objects in OR. The object could be a set of values, or a plain literal that is in turn retrieved through a free-text search.
Custom Search
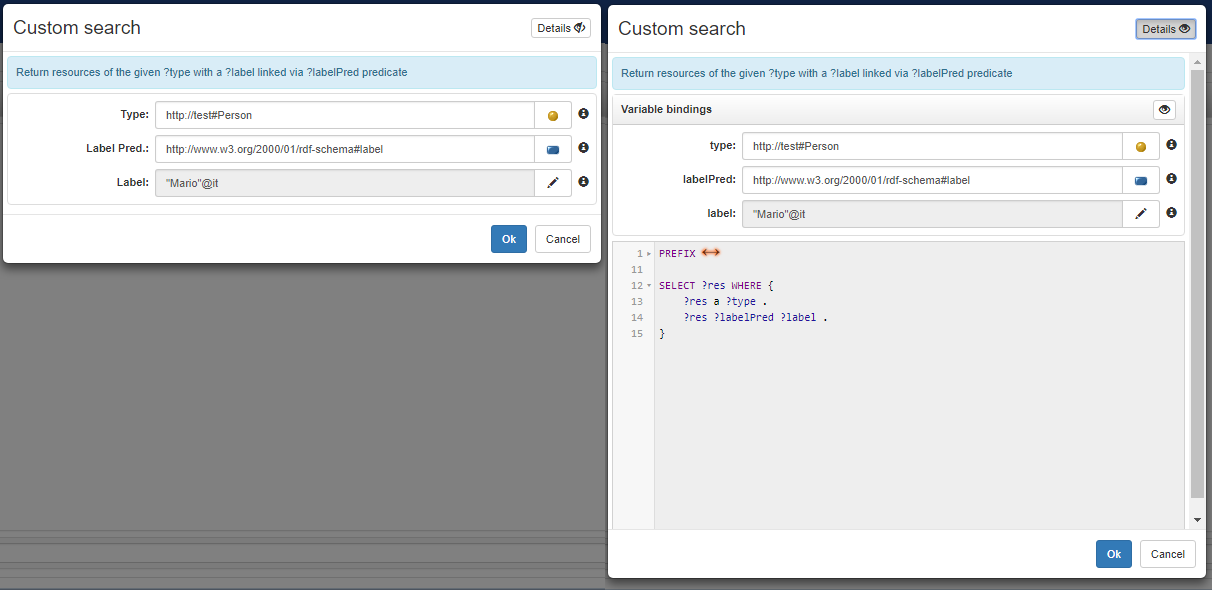
The custom search exploits the power of SPARQL to execute customizable search. A custom search can be instantiated selecting a previously stored parameterized query which must return a single variable (if not, an error will be displayed when running the search).
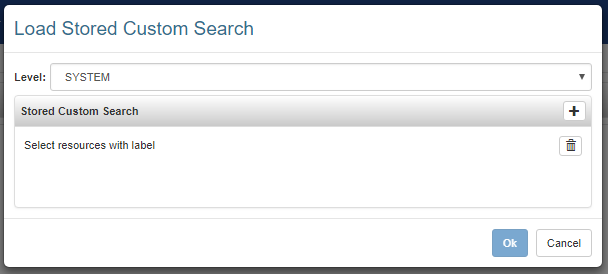
The UI shows a form composed by as many input fields as parameters defined by the parameterized query. Each input field guides the user to enter a value that is compliant with the constraints defined by the related parameterized SPARQL query. For instance, in the example shown in the following figure, the Type field suggests to enter a class, Label Pred. a property and Label a string or a plain literal.
Enabling the details (by clicking on the Details button in the top right corner) the UI shows the variable names (instead of a display name) beside each fields and also the SPARQL query related to the custom search.
Data View Tabs
As of version 8.0, the DataView panel provides three different tabs offering different perspectives on the resource being shown:
- resview: the resource view is the default view over a resource and contains everything that has been described so far in this page
- codeview: the code view shows all the triples related to the described resource. Given the proper authorization, it is possible to edit these triples and save the change in the data
- termview (only for skos concepts): a simplified view for terminologists. It allows for the modification of labels and definitions in various languages.
Data View Pages
Depending on the dataset being edited (an OWL ontology or a SKOS thesaurus), two different set of views are available:
- OWL Vocabulary: Class, Property and Datatype views
- SKOS Thesaurus: Class, Concept, Scheme, Collection and Property and Datatype views
- OntoLex-Lemon Lexicon: Class, Concept, Scheme, Collection and Property, Lexicon, Lexical Entry and Datatype views
Graph View
In addition to the Data Structure Views (trees and lists), it is possible to explore the data through the Graph View.
VocBench provides three kinds of Graph View:
- Data-oriented: it is a close representation of the RDF graph, with nodes representing resources and edges representing properties.
- Model-oriented: it is oriented to the relations that describe the ontology model, like the relations between the domain and range classes of a property.
- Class-diagram: an UML-like class-diagram that describes relations between classes and their properties.


