


The Projects page
VocBench is a collaborative platform. As such, different users may collaborate on a same project with different editing privileges. Above all users, the administrator is in charge of creating projects and of assigning them managers.
There are mainly two pages related to projects:
- The landing page for the administrator, showing the list of available projects, their status, characteristics etc.., allowing the administrator to create new projects, delete them etc..
- The Project Management page, which is available also to Project Managers
Listing, Creating, Deleting Projects
Projects can be listed, created and deleted by the administrator through the Landing Page, that is reached by the administrator right after they log into the system
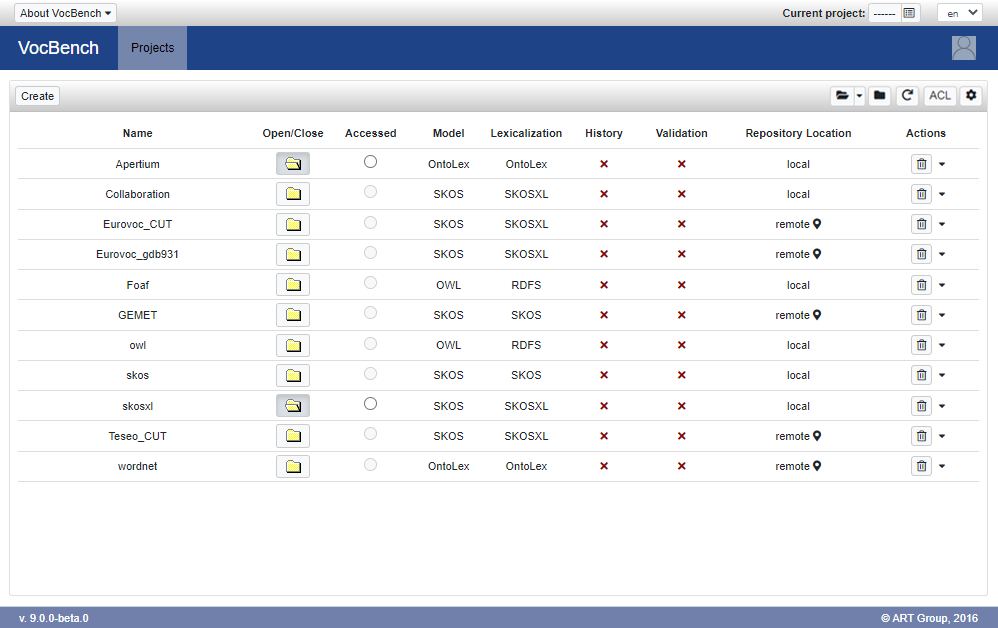
The pages shows a table that will be filled with the projects created inside VocBench. Here follows a description of the table headers:
- Project Name : The name of the project
- Open/Close: tells whether a project has been opened inside the system. A project can be closed in order to release its resources. However, when a project is closed, it is not possible for common users to access it.
- Accessed: if the project has been selected by the user and is thus the one currently accessed by the client browser. All operations focused on a specific project will assume this selection as the reference project
- Model: the type of the dataset, it can be an RDFS or OWL ontology, a SKOS thesaurus, or an OntoLex lexicon
- Lexicalization: the type of lexicalization adopted, it can be RDFS, SKOS, SKOS-XL or OntoLex
- History: tells whether history has been activated for this project
- Validation: tells whether history has been activated for this project
- Repository Location: remote or local
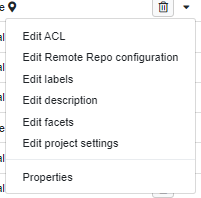
- Actions: a button for deleting a project and a context menu for further actions (e.g. Edit ACL, edit project settings, see project Properties, ...)
Through the buttons on the panel heading it is possible to:
- Create a new Project
- Open or close all the projects in one go
- Refresh the projects list
- Inspect the ACL matrix
- Changes the project view settings and customize the project facets schema (both under the cog button)
Which kind of project best suits my needs?
In VocBench we introduced the notion of semantic model, or simply model, implying the core modeling vocabulary that is being used. Roughly speaking:
- if you are developing an ontology, the model to be adopted is OWL
- for a thesaurus or any kind of KOS (Knowledge Organization System), including authority lists, terminologies etc.. the model should be SKOS
- while if you are interested in developing a lexical resource with a fine-grain on lexical aspects (e.g. distinction between lemmas and other forms, term composition, lexical relations etc..) Ontolex-Lemon should be your choice.
Project Creation
To create a new project click on "Create" button. You will be prompted with a window like the one in figure below:
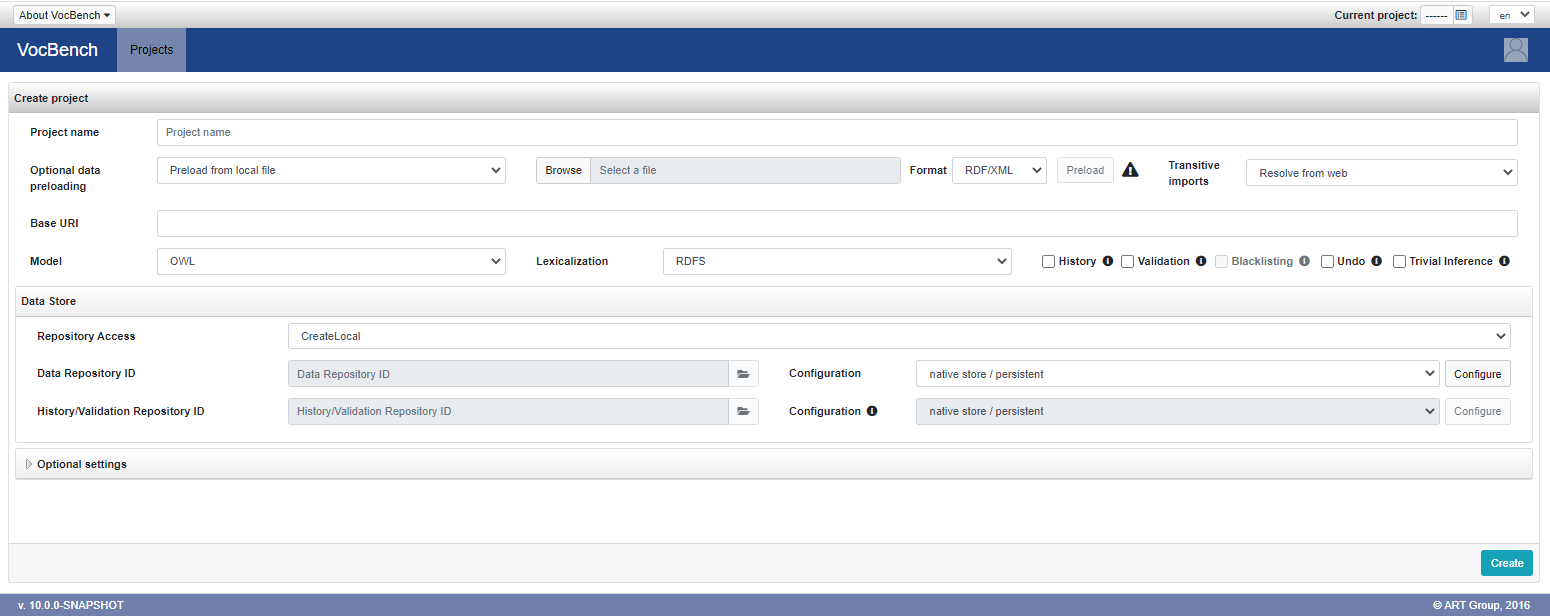
Here you have to fill (in order of appearance) the following fields:
- Project Name: the name of the project. Any name which can be stored as a folder in the file system is a valid project name.
- Optional data preloading: allows the user to preload data during the project creation. The available choices are:
- Do not preload any data: default selection, skips the data preloading.
- Preload from local file: loads the content of an RDF file picked from the local filesystem.
- Preload from URI: fetches and loads the data referenced by an URL (e.g. http://xmlns.com/foaf/0.1/).
- Preload from Dataset Catalog: exploits available Dataset Catalogs for loading a vocabulary.
 ), the preload operation will also try to infer and set the Base URI, Model and Lexicalization fields automatically.
- Dataset: each project must be associated with a dataset registered in the Metadata Registry. The selector lists the available datasets. The compass icon allows automatic detection of a Dataset archetype based on the entered base URI, while a new one can be created on the fly using the
+button. - Version: specifies the version of the dataset associated with the project. A default value (
1.0.0-SNAPSHOT) is prefilled but can be edited as needed. It is recommended to adopt semantic versioning (e.g.<major>.<minor>.<patch>-<modifier>). - Base URI: any valid ontology URI is accepted. If the uri ends with no trailing # nor /, the default namespace will end with a #. If the URI ends with /, the default namespace will be the same as the baseuri.
- Model: it can be RDFS, OWL, SKOS or OntoLex depending on the model (RDFS and OWL for ontologies, SKOS for thesauri, OntoLex for lexicons) you want to adopt for your data.
- Lexicalization: it can be RDFS, SKOS, SKOS-XL or OntoLex depending on the lexicalization model you want to adopt for your data. If the adopted Model is OntoLex, then the Lexicalization model is forced to be OntoLex as well.
Please note that: as of version 4.0 and 5.0 of VocBench, the settings for the combinations of other models (RDFS, OWL or SKOS) with Ontolex as a lexicalization model in a project need still improvement. As a consequence, if you need to use Ontolex-Lemon at any extent in your project (from simply lexicalizing an existing ontology with lexical entries from an existing lexicon to building from scratch all of these resources we strongly suggest to choose Ontolex-Lemon both as the (semantic) model of the project and the lexical model. - History, Validation and Blacklisting: the checkboxes have to be ticked in order to activate the respective features for the project being created. Blacklisting can be activated only if Validation is activated as well.
- Undo: Enable the possibility to undo operation on the data.
-
Trivial Inference: optionally enables trivial reasoning (e.g. resolution of inverse and symmetric properties) to assert and retract triples.
Upon the addition of a triples p o:- if
pis anowl:SymmetricProperty, then the tripleo p s(swapping the subject and object of the original triple) will be also added - if
phas inversep'orp'has inversep, then the tripleo p' s(swapping the subject and object of the original triple, and using the inverse property as predicate) will also be added
s p o, the triple that would have been materialized according to the rules above will be also deleted.
This trivial reasoning is based on the schema existing at the beginning of a transaction: therefore, its soundness and completeness depends on the fact that a property is not used in the same transaction that manipulates its definition. - if
Section Data Store:
- Repository Access: one of:
- CreateLocal: creates a local data repository.
- CreateRemote: creates a repository on a remote triple store. Currently there are configurable settings for RDF4J and GraphDB stores.
- AccessExistingRemote: access an existing repository and creates a project by using the data already there.
- Technology: specifies the technology of the triple store instance to be used. Currently only GraphDB and RDF4J are supported. When CreateLocal is selected, the choice is limited to RDF4J, which represents the embedded distribution included with Semantic Turkey
- Triple Store instance: enabled only for remote repositories, this selector allows specifying the remote triple store instance to use. It lists all available instances defined in the Data Storage page that are compatible with the chosen technology. New instances can also be created on the fly by clicking the + button on the right of the selector.
-
Data Repository:
- ID: the identifier of the repository. For both "Create" options for repository access, this field is locked and follows predefined conventions. When AccessExistingRemote is selected, the field is editable to enter the remote repository ID. A browsing option is available to select from repositories hosted on the specified triple store instance.
- Configuration: the configuration to use to manage the repository within the instance. It lists all available configurations defined in the Data Storage page that are compatible with the chosen technology. New configurations can also be created on the fly by clicking the + button on the right of the selector, while existing ones can be edited through the pencil button.
- Support Repository: required if either the History or Validation feature is enabled. It must be configured similarly to the Data Repository.
Section Optional Settings:
This section is initially hidden, because the default configuration will be fine in most circumstances. The figure below shows the content of the section, after the user clicked on the collapse/expand (rotating) triangle near the section name.
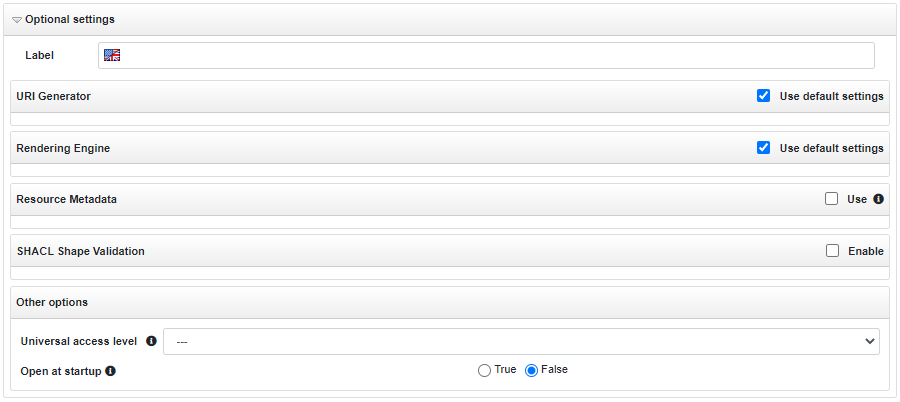
These are the additional settings available here:
- Label: a human readable label displayed in place of the project name when the project rendering is enabled.
- URI Generator: this section allows to configure which URIGenerator that will be used generate resource URIs automatically (in those circumstances in which the user has not indicated them explicitly).
- Rendering Engine: this section allows to configure which Rendering Engine will be used to produce a human-intelligible representation of the resources displayed in different parts of the UI.
- Resource Metadata: this section is about the configuration of the automatic management of resource-level metadata. It has been originally designed for the automatic update of date-time metadata about created or modified resources, but its usage could be wider. This topic is explained in detail on the dedicated page.
- SHACL Shape Validation: this section is about data validation using SHACL shape definitions. To enable such feature, it is necessary to:
- check the checkbox "Enable"
- after the project has been created, load shapes that define actual constraints on the data
- Validation enabled (true by default): tells whether the (loaded) SHACL shapes are enforced interactively on every commit, aborting any change that would violate any constraint. Consequently, the data will always be valid with respect the loaded shapes. Conversely, if this setting is set to false, then data can become invalid and violations can be detected later by means of the batch validation. This settings can be changed afterwards
- Validation results limit total (-1 by default): limits the number of validation results per report: -1 means unlimited, 0 means that validity is ascertained but not validation result is reported in detail, while n means that at most n results will be included in the report. The property rdf4j:truncated has been introduced to indicate whether a report is truncated or not
- Validation results limit per constraint (true by default): limits the number of validation results per constraint. The same policy discussed above applies
Both the URIGenerator and the Rendering Engine is configured by the system automatically, by choosing an implementation suitable for the indicated lexicalization model. To choose a different implementation, do the following:
- Uncheck the checkbox "User default settings"
- Use the dropdown "Plugin" to choose the implementation
- Use the dropdown "Configuration" to choose a configuration type, and if enabled press the button "Configure" to edit the configuration properties
The documentation of Semantic Turkey lists the predefined URIGenerator and RenderingEngine implementations, together with their configuration options.
Optional settings continues with these additional sections:
- Project facets: it allows the assignment of project facets contextually to the project creation.
- Other options:
- Universal access level: Set the universal access level for this project. The default for this option can be established in the System configuration panel. More details about this option in ACL documentation.
- Open at startup: If true, the project is automatically opened when SemanticTurkey server starts up. As well as the previous option its default can be configured from the System configuration panel.
- Publicly accessible: If true, the project will be accessible with read-only permissions to any authenticated user, even if they are not explicitly assigned to It
Project Templates
To facilitate and accelerate the creation of new projects, project templates can be defined. These templates prefill the main information required during project creation, reducing repetitive configuration tasks and ensuring consistency across projects.
A template includes most of the information found in the project creation form and already explained in the previous section, such as a base URI, which in this case may represent a common base URI (or prefix) shared by multiple projects, the data model, the lexicalization model, the features to enable, the data store configurations, and a subset of the optional settings.
None of these fields is mandatory; it is possible to fill in only the items that are useful and leave the others empty. This allows templates to provide a complete starting point for new projects while still leaving room for project-specific customization.
To enable the project template editor, the "Create Template" switch located in the top-right corner of the project creation form must be activated. Once enabled, the form layout changes slightly, displaying only the sections relevant for defining a template.

In addition to project specific aspects, a template also requires a name and a description to be provided.
Templates can be saved for reuse in future project creation. They can be reused either by loading a template directly from the project creation form using the "Load Template" option in the top-right corner, or by selecting the "Create from Template" option positioned next to the "Create" button on the main projects page. Once a template is chosen, the project creation form is automatically filled with the fields defined in the template.

Repository Configuration
Each triple store may support different type of configurations. Currently there are configurable settings for RDF4J and GraphDB stores.
In particular, RDF4J offers three kind of connections:
- in-memory: a repository managed completely in-memory. The two options provided by the connector (persistent/non persistent) specify which kind of project will be managed. In the first case (persistent) the data will be always saved in real time, with user modifications, in the latter case it will require for the project to be explicitly saved
- native: this corresponds to a repository using dedicated on-disk data structures for storage
- remote: allows for remote connection to a RDF4J-compliant server. Currently supported stores are RDF4J itself and GraphDB.
The Configuration menu provides a list of properties which depend on the chosen triple store. These properties are declared by the connector itself and are thus dynamically fed to the user interface. The documentation for the parameters of RDF4J is available in a dedicated section of the RDF4J user manual. Same for GraphDB Sail Configuration.
However, a tooltip over each of the shown parameters should provide enough explanation to understand its use.
Also, in case of a remote connection, if any of History or Validation (or both) has been selected during the initial part of the project configuration, the changetracking-sail jar should be dropped onto the target triple store, see instructions in the system-administration manual. Similarly, if Trivial Inference Engine has been selected, the trivial-inference-sail jar should be dropped onto the target triple store
Project settings
Some of the settings configured during the project creation procedure can be changed once the project is already activated. From the projects list page, by clicking on the Edit project settings option in the project context menu, the following dialog is prompted.
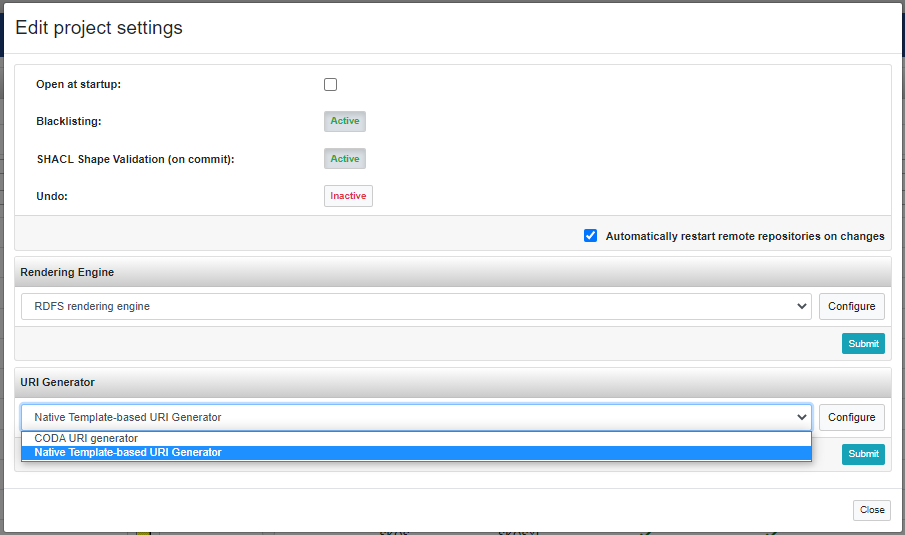
Some settings, in order to be edited, strictly require the project to be inactive, so the above editor is available only for closed projects.
From such editor it is possible to:
- Activate or deactivate the Open at startup option, in order to let the system automatically open the project when the SemanticTurkey server starts up.
- Activate or deactivate the Blacklisting option (only for project with Validation activated). See History, Validation and Blacklisting documentation for details about this feature.
- Activate or deactivate the SHACL Shape Validation (on commit) option (only for project with SHACL Validation enabled). When active, the validation of SHACL shapes is run at every commit.
- Activate or deactivate the Undo feature.
- Change the Rendering Engine adopted and its configuration.
- Change the URIGenerator adopted and its configuration.
Note: in order to make the changes effective it may be necessary to restart the repository. This operation can be executed automatically on remote repositories by ticking the dedicated checkbox (see the figure above), or, in case of local projects, it has to be executed manually.
Project labels
Project renaming is an operation not allowed in VocBench. This limitation is due to the fact that the project name is actually an identifier which is widely referenced in the data structure of SemanticTurkey. In order to overcome this limitation, VocBench offers the possibility to set multilingual labels to projects. From the context menu of the project, by clicking on Edit labels entry, the following dialog is prompted where you can set a label to show for a specific language.

User can enabled/disable the visualization of the labels through the rendering button ![]() placed on the top bar of the project list. The label shown when rendering is enabled depends on the active localization language. If no label is set for the active language, the project rendering falls back on the project name.
placed on the top bar of the project list. The label shown when rendering is enabled depends on the active localization language. If no label is set for the active language, the project rendering falls back on the project name.
Further actions
Once a project has been created, by selecting it, it is possible to enable further actions. It is possible in fact to delete a project, just clicking on the button with the trashbin icon under the Actions column.
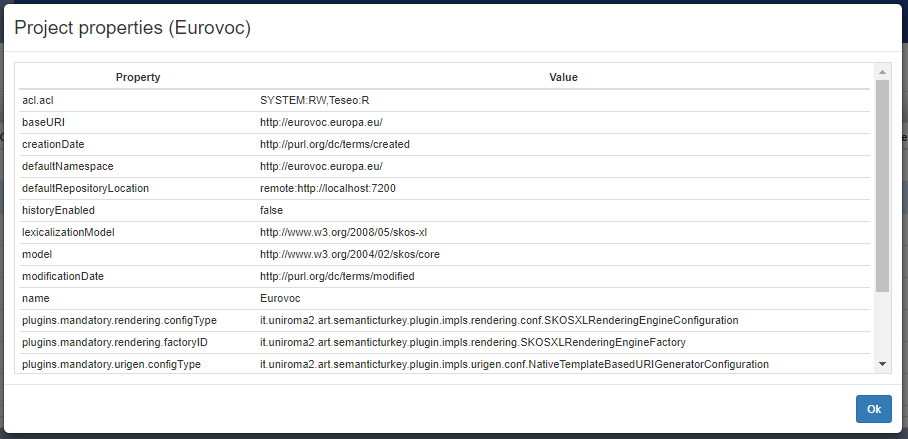
By clicking on the Properties entry in the project context menu a modal dialog shows basic properties of the project
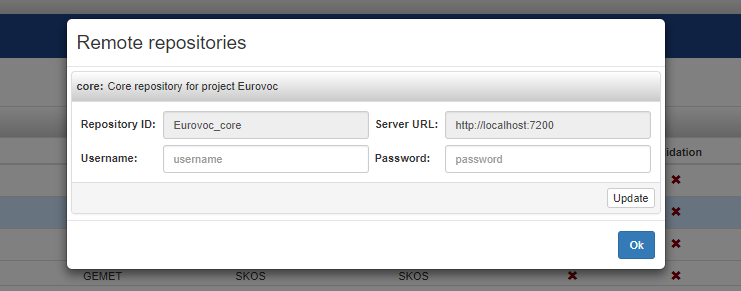
Only for remote (and close) projects is also possible to show and edit the information to access to the remote repository. The following dialog can be open by clicking on the Edit remote Repo configuration entry in the project context menu.
Project facets
In case of large amount of projects loaded in VocBench, the default view, which consists in a flat list of projects, may result poorly organized and difficult to read. This is where the new facts-based view, available from version 9.0.0, comes useful. This view allows you to group projects according a chosen facet in order to make the view cleaner and organized efficiently.
The facets are aspects and attributes that characterize a project. VocBench provides six pre-defined facets: Model, Lexicalization, History and Validation, which are unmodifiable attributes chosen during the creation of the project, Category and Organization.
In addition to such pre-defined facets, VocBench allows the administrator to define custom facets.
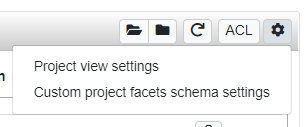
Clicking the "cog" button in the top right corner of the panel and selecting the entry Custom project facets schema settings, the following dialog is prompted.
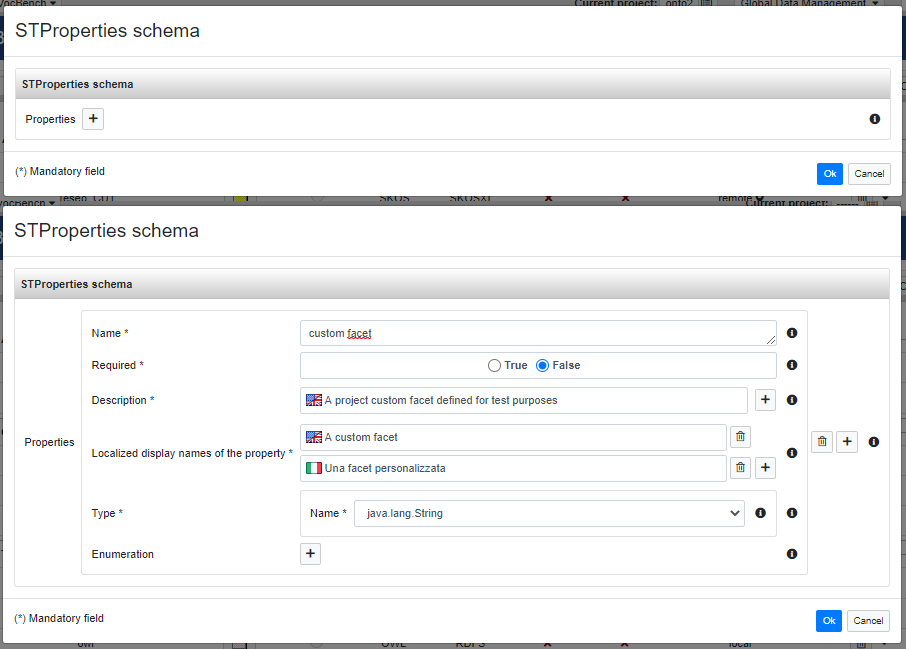
A new facet can be added through the "plus" button. Then the editor shows several fields that can be filled in order to define a new facet:
- Name: a unique name that identifies the facet;
- Required: tells if the facet must be provided to the project;
- Description: a natural language description that provide further information to the user (it will be displayed as a tooltip). It is possible to provide multiple descriptions in different languages, VocBench will display the proper description according the chosen localization;
- Localized display names: the facet name to display to the user. Also in this case, as well as the description, multiple names can be provided in order to support the multilingual UI;
- Type: the value type of the facet (e.g. string, integer, boolean, ...);
- Enumeration: optionally an enumeration can be defined in order to restrict the admitted values;
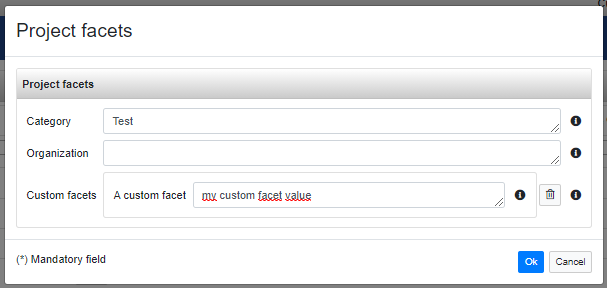
Clicking on the Edit facets entry in the project context menu (under Actions column), the following dialog shows up and it allows the editing of the project facets. As you can see, there are the built-in facets Category and Organization plus the custom one just defined.
Now that we know what facets are, how to define customs and how to set them in a project, let's see how can they be used to organize the project view.
As we have already seen, the "cog" button, placed on the topbar of the project list, opens a menu.
Selecting Project view settings, user can customize the visualization of the project view.
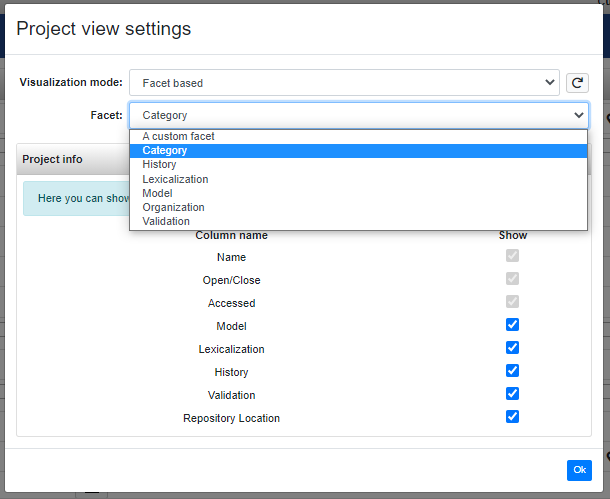
Here it is possible to choose between two visualization mode: List, namely the "classic" flat list of projects, and Facet based. Selecting the latter, it appears a Facet selector which allows the selection of the facet on which the projects have to be grouped.
Additionally, in the same dialog, it is possible to customize the info shown in the list by changing the columns order or hiding some of them.
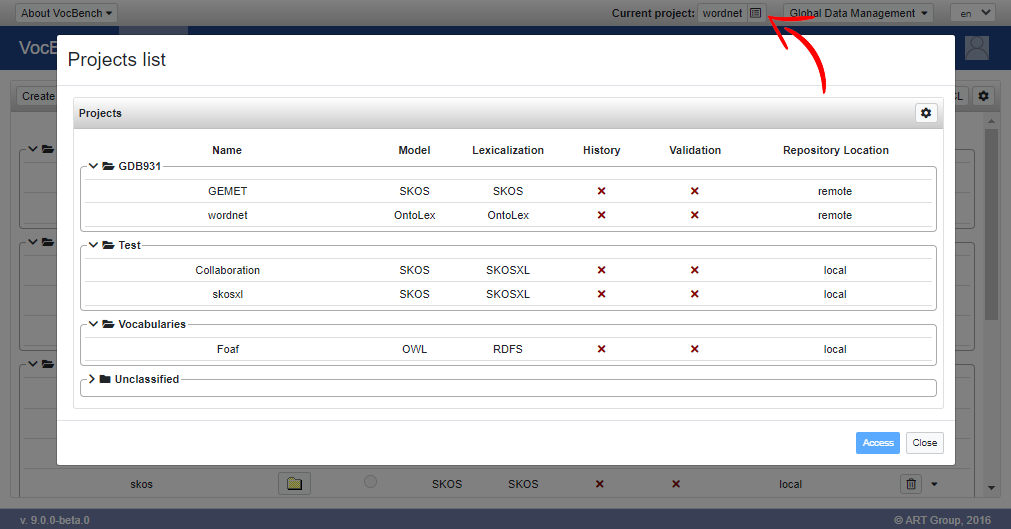
Here it is an example of facets-based visualization based on Category. The categories here shown have been assigned arbitrarily by the administrator. The last one "Unclassified" is a dedicated group that collects those projects where the category (or in general the chosen facet) has not been specified.

Note: projects facets can be created, edited and assigned only by administrator users, which are the only users who can access the Projects page. Anyway the possibility to change the visualization preferences through the Projects view settings dialog, is also available for non-admin users through the project selection dialog (the one accessible through the button on the topmost bar of the screen).
Project Access Control
Each project in VB contains an Access Control List, representing the consumers that can access its content. This enables a permission-by-delegation mechanism for which a project can automatically grant access to its content to users logged on another project, providing that this second project has been allowed to access the content of the first.